
Last Updated: March 12th, 2026
This is the Lesson of English Typing Course.
Its Completely Free, No payment or Card Information Required.
Log In To EnrollWelcome to the very first day of our exciting 30-day free typing course! Today, we are going to learn proper 10-finger placement on the keyboard. Ready to get started? Feel free to jump into our interactive typing game below! If you would like to understand the ‘why’ behind the method first, read on to learn the fundamentals of proper finger placement.
| Rank | User | WPM | Accuracy | Attempts | Date |
|---|---|---|---|---|---|
| 1 | Sourav Roy | 29 | 100% | 2 | Jul 8, 2026 |
| 2 | Brandy Kamarainen | 29 | 99% | 1 | May 30, 2026 |
| 3 | Sumaya Hassan | 26 | 95% | 1 | Apr 29, 2026 |
| 4 | Safiya Kausar | 23 | 97% | 1 | Mar 31, 2026 |
| 5 | Arpi bithy | 16 | 98% | 1 | Apr 11, 2026 |
| 6 | momena fatima | 16 | 100% | 15 | May 4, 2026 |
| 7 | Hs8tui Qi | 16 | 100% | 1 | Jun 1, 2026 |
| 8 | Emmanuel Sironga | 16 | 98% | 1 | May 14, 2026 |
| 9 | Raymonda Moody | 16 | 100% | 4 | Jun 9, 2026 |
| 10 | Black Shorts | 14 | 97% | 5 | May 19, 2026 |
Table of Contents
Proper 10-Finger Placement
Why is correct finger placement so important? It is very simple to learn Touch Typing. It is very important to place the 10 fingers in the correct positions to increase typing speed and type like a blind person.
The Home Row: Your Starting Point
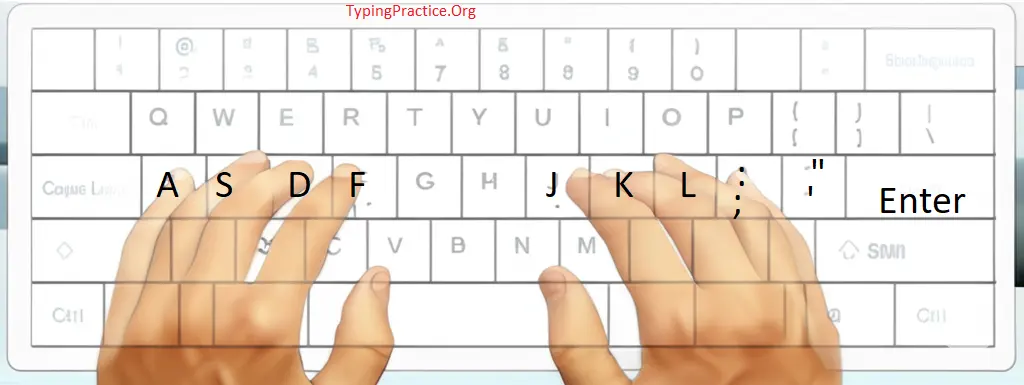
The foundation of 10-finger typing lies in the home row. These are the keys where your fingers should rest when you’re not actively typing. On a standard QWERTY keyboard, the home row keys for your left hand are A, S, D, and F, and for your right hand, they are J, K, L, and the semicolon (;). Please note that neither thumb is usable in the row; however, they can be used in other rows and special keys.
Place your finger on the following keys.
- Your left index finger on F
- Your left middle finger on D
- Your left ring finger on S
- Your left pinky finger on A
- Your right index finger on J
- Your right middle finger on K
- Your right ring finger on L
- Your right pinky finger on ;
Notice the small raised bumps or ridges on the F and J keys? These are tactile guides that use modern keyboard layouts to help your index fingers find their way back to the home row without looking.
Practice Makes Perfect, and do it in a fun way.
We have already provided the traditional interactive real-time task of typing. We are also providing an exciting game that is more engaging and learning-friendly. We hope you will also enjoy it.
AI-Powered Analysis for Personalized Learning
At our typing course, we believe in using technology to enhance your learning experience. In addition to the traditional interactive typing task and its analysis, we have also provided an AI-powered analysis that provides you with detailed feedback on errors in your typing patterns, if applicable. Our AI can easily identify areas where you might be struggling with finger placement. After completing the task, it provides personalized insights and a new task to help you fix your errors quickly so you can become a touch-typing master.
Other Lessons of 30 30-Day Typing Course
| Day-wise Lesson | Lesson Link |
|---|---|
| Day 1 Lesson | Proper 10-finger placement. (You are here) |
| Day 2 Lesson | Home Row Typing |
| Day 3 Lesson | Bottom row key exercise. |
| Day 4 Lesson | Revision of the last Three Lessons |
| Day 5 Lesson | Top Row Lesson |
| Day 6 Lesson | Advanced Top Row Typing Practice & Drills |
| Day 7 Lesson | Full Alphabet Practice (All Rows) |
| Day 8 Lesson | Typing Revision for Top Row & Full Alphabet |
| Day 9 Lesson | How to Use the Shift Key for Capital Letters |
| Day 10 Lesson | Typing Punctuation Practice (. , ?) |
| All Lessons of 30 30-Day Typing Lessons | |
Your learning journey to become a typing master has started with the online typing tests and practice. We hope that you have completed it successfully and enjoyed the lesson. We also want to meet you at the next class.
We hope you are enjoying this Typing Practice website, where you can learn these skills for free.
Frequently Asked Questions (FAQ)
Here are answers to some common questions about 10-finger typing.
What is the home row on a keyboard?
The home row is the central row of the keyboard where your fingers rest by default. Think of it as your base camp for typing. On a standard QWERTY keyboard, the home row keys are A, S, D, F for your left hand and J, K, L,; for your right hand. All other keys are reached from this starting position.
Why is proper 10-finger placement so important?
Proper 10-finger placement is the secret to fast and accurate typing. And it is the main part of a skill called “touch typing.
How do I find the home row without looking?
Most keyboards have a built-in guide to help you. If you run your index fingers along the home row, you will feel small raised bumps or ridges on the ‘F’ and ‘J’ keys. This indicates you are coming back and repositioning your fingers. However, it will be briefly described further.